Hood Stripes & Installation
Posted: Mon Jan 19, 2009 11:06 am
Hey Gang,
I got a PM about the hood stripes on my Road Runner, i.e. the "railroad tracks" and thought I'd share the reply I sent him in case anybody else is interested in a "how to" story. May not be for everyone, but since I'd composed it, the 'ol cut & paste makes it easy.
So...FWIW....here's what I put in my PM reply.
I got them from Year One and they are still available. They come in a kit, both sides (22 stripes each side) and cost $148 which is down from the $162 I paid.
Each side has all 22 stripes, aligned and attached to a top backing sheet that keeps them aligned until it is peeled off. The bottom also has a backing sheet that when peeled off exposes the adhesive that sticks them to the hood & fender. They are put on after painting and clear coating.
The are tricky to put on but it can be done. It takes a LOT of TIME to do it right and without ruining the entire set, or your paint.
Alignment is the tricky part. They fit up against the hood cal louts which have to be put on first. I used masking tape on each side to align the stripe kit. You have to keep the individual stripes attached to the upper backing sheet until they are glued to the car!
The way this is done is to start at the top (on the hood, at the hood cal louts) and spray a soap/water mix on the paint. Then peel off the bottom backing of the top two stripes (topmost pair) and put it on the hood. The soapy water keeps them from sticking to the paint. Then you CAREFULLY, VERY CAREFULLY use a squeegee to work the soapy water out from under the stripes with the bottom backing pulled off. As you work the soapy water out, they will stick to the paint. THIS TAKES A LOT OF TIME AND YOU CAN'T RUSH IT!
Remember all 22 stripes are kept aligned by the upper backing sheet so if you get the first two on crooked the whole set will be crooked! It would be nearly impossible to get them straight after that, hence the entire set is ruined!
After the top two are completely stuck to the paint (it also takes time to get the tiny bubbles out!) you repeat the process with the rest of the stripes working down across the hood, onto the fender, a pair of stripes at a time. AGAIN...THIS TAKES TIME AND PATIENCE!
It gets a little tricky as you move over the top of the fender and down the side as the side of the fender not only is down from the top, but it also is further out at the rear of where the stripes will be than the front. You have to slit the upper backing sheet as you go over this transition to make it lie down flat. But you still have to keep the upper backing sheet mostly in place to keep the stripes aligned!
I took two days, one for each side. But they came out looking real good and were aligned! The killer part is aligning them so the last stripe on the hood and the first one one the fender are each the same distance from their respective edge when the hood is closed!
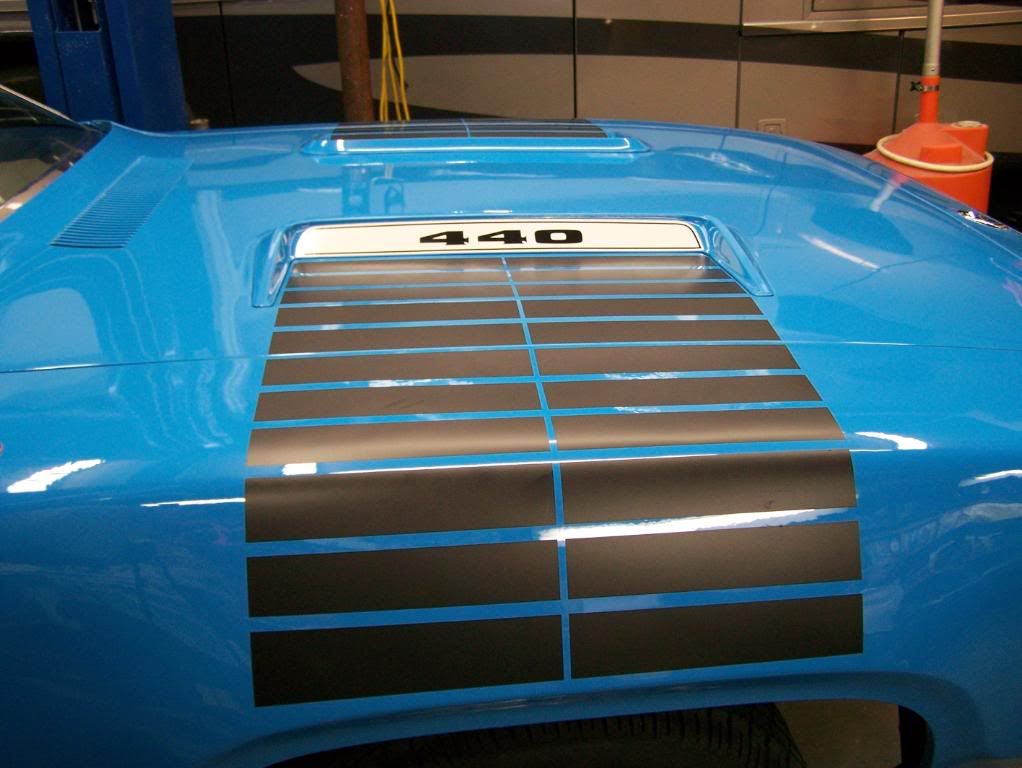
Here's a pix of the finished job. You can see the compound curve of the fender as well as the fact that all the 22 stripes are NOT the same size. The bottom rear one is tapered slighly rather than being rectangular.
Here's a link to some more images on Photo Bucket
"Railroad Tracks" Hood Stripes
As I said...it can be done, but it's TRICKY & TAKES TIME! It's also easy to screw it up and ruin some expensive parts! But if you're adventursome...go for it. The reward of doing it yourself is worth the effort IMHO.
If you have a body/trim shop around ask them for any tips they might have. Or if you are so inclined, see how much they would charge to do the job, as I really don't have the slightest idea.
When I wax the car I try and avoid getting wax on the stripes. It's kind of a pain as I have to still wax the paint between them. I use Son of a Gun spray on the stripes themselves.
The come in black, flat black, red and white. I used the flat black as that is what they were from the factory when I bought he car new.
I realize this is a lot of info, but hope it helps.
I got a PM about the hood stripes on my Road Runner, i.e. the "railroad tracks" and thought I'd share the reply I sent him in case anybody else is interested in a "how to" story. May not be for everyone, but since I'd composed it, the 'ol cut & paste makes it easy.
So...FWIW....here's what I put in my PM reply.
I got them from Year One and they are still available. They come in a kit, both sides (22 stripes each side) and cost $148 which is down from the $162 I paid.
Each side has all 22 stripes, aligned and attached to a top backing sheet that keeps them aligned until it is peeled off. The bottom also has a backing sheet that when peeled off exposes the adhesive that sticks them to the hood & fender. They are put on after painting and clear coating.
The are tricky to put on but it can be done. It takes a LOT of TIME to do it right and without ruining the entire set, or your paint.
Alignment is the tricky part. They fit up against the hood cal louts which have to be put on first. I used masking tape on each side to align the stripe kit. You have to keep the individual stripes attached to the upper backing sheet until they are glued to the car!
The way this is done is to start at the top (on the hood, at the hood cal louts) and spray a soap/water mix on the paint. Then peel off the bottom backing of the top two stripes (topmost pair) and put it on the hood. The soapy water keeps them from sticking to the paint. Then you CAREFULLY, VERY CAREFULLY use a squeegee to work the soapy water out from under the stripes with the bottom backing pulled off. As you work the soapy water out, they will stick to the paint. THIS TAKES A LOT OF TIME AND YOU CAN'T RUSH IT!
Remember all 22 stripes are kept aligned by the upper backing sheet so if you get the first two on crooked the whole set will be crooked! It would be nearly impossible to get them straight after that, hence the entire set is ruined!
After the top two are completely stuck to the paint (it also takes time to get the tiny bubbles out!) you repeat the process with the rest of the stripes working down across the hood, onto the fender, a pair of stripes at a time. AGAIN...THIS TAKES TIME AND PATIENCE!
It gets a little tricky as you move over the top of the fender and down the side as the side of the fender not only is down from the top, but it also is further out at the rear of where the stripes will be than the front. You have to slit the upper backing sheet as you go over this transition to make it lie down flat. But you still have to keep the upper backing sheet mostly in place to keep the stripes aligned!
I took two days, one for each side. But they came out looking real good and were aligned! The killer part is aligning them so the last stripe on the hood and the first one one the fender are each the same distance from their respective edge when the hood is closed!
Here's a pix of the finished job. You can see the compound curve of the fender as well as the fact that all the 22 stripes are NOT the same size. The bottom rear one is tapered slighly rather than being rectangular.
Here's a link to some more images on Photo Bucket
"Railroad Tracks" Hood Stripes
As I said...it can be done, but it's TRICKY & TAKES TIME! It's also easy to screw it up and ruin some expensive parts! But if you're adventursome...go for it. The reward of doing it yourself is worth the effort IMHO.
If you have a body/trim shop around ask them for any tips they might have. Or if you are so inclined, see how much they would charge to do the job, as I really don't have the slightest idea.
When I wax the car I try and avoid getting wax on the stripes. It's kind of a pain as I have to still wax the paint between them. I use Son of a Gun spray on the stripes themselves.
The come in black, flat black, red and white. I used the flat black as that is what they were from the factory when I bought he car new.
I realize this is a lot of info, but hope it helps.


