Speaking of front end rebuild

Technical Question and Answer - On topic to 71-74 Plymouth B-bodies only.

Moderator: Site Administrators

Post Reply
billzilla

Speaking of front end rebuild

Post by billzilla » Fri Mar 07, 2008 8:30 pm

Has anyone done this job? What do you need, how rough a job is it, what kind of stands/lifts can you get away with? Any special tools needed?

I just can't see paying my local shop $450+ to do this for me, even if it does wind up taking a whole weekend or whatever.

:shock:

Are there (hope against hope) any GUIDES or photo documentaries of other people doing their B-Bod front ends? That would be particularly cool.

CtownRunner
GTX (RS)
Posts: 587
Joined: Wed May 05, 2004 9:48 pm
Location: Cleveland, the North Coast

Post by CtownRunner » Sat Mar 08, 2008 8:24 am

There are a few special tools needed.
One is for removing the upper ball joint and another for pressing in and out the upper control arm bushings.

Just Suspensions sells them I think, Other vendors of front end kits sell the tools also.I used my brothers set. Most Mopar mags have adds for someone selling what you need.
I would have no less then 4 jack stands.
Breaker bar. Deep sockets, 1/2 in drive, torque wrench and lots of PB blaster soak every connection for a week before starting.

Do one side then the other so you have something to refrence back to.

I'd replace shocks now too.

It is doable, Just remember you will have to have a major front end alignment when you done.
I went with rubber instead of poly bushing. That's OK but I think I'd go poly with next car I tackle.

I know there are details I left out that I have read here before.
Image

User avatar
bruce
Site Admin
Posts: 2123
Joined: Fri Nov 07, 2003 5:21 pm
Location: North Carolina
Contact:

Post by bruce » Sat Mar 08, 2008 9:01 am

I've done mine, and had it powdercoated while I was at it... As was said, there are some special tools required, and I was fortunate to have the US Car Tool shop available.
Last edited by bruce on Sat Mar 08, 2008 10:33 am, edited 1 time in total.
Bruce Anliker

CtownRunner
GTX (RS)
Posts: 587
Joined: Wed May 05, 2004 9:48 pm
Location: Cleveland, the North Coast

Post by CtownRunner » Sat Mar 08, 2008 9:58 am

Found them
tools can be had at

www.americanmuscle.biz

restoration tools & parts

877-230-5336

Good old shop manual can help guide you.

Lots of magazine articles out there.
I'd look at Mopar muscle, Mopar Action, Mopar Collectors guide they all have web sites and links to many articles that may help.

www.moparcollectorsguide.com

www.moparmusclemagazine.com

www.moparenthusiast.com

www.mopaaction.com
Image

billzilla

Post by billzilla » Sat Mar 08, 2008 1:34 pm

Okay, let's see if I've got this:

4 (good) Jack Stands
Deep Sockets (check) w/ 1/2" drive
Torque Wrench
PB Blaster <--- what's this, a WD40 type un-stick thing?
Ball Joint remover tool <---- is this the U puller?
Breaker Bar
Control arm bushing press tool

I did go rubber because I've heard some bad things about poly from some folks (being too hard, noisy). They're also much cheaper.

moparmarks
Satellite Sebring Plus (RP)
Posts: 78
Joined: Fri Mar 25, 2005 3:21 pm
Location: Grand Jct Colorado

Post by moparmarks » Sat Mar 08, 2008 1:34 pm

Done several front end jobs.
T-bars fronts are probably the easiest front suspension to rebuild.
Couple thing to make to job go easier is a upper ball joint socket and a T-bar tool. Most everything else can be R+Red with common auto tools.
I would take the arms to a shop to have the bushings R+Red if you don't have the proper tools.
Be sure to releave the T-bar tension before removing anything.
Might want to think about replacing that 30 year old steering box while your at it if thats the case.
Also a good time to do up grades such as disc brakes, larger T-bars and sway bar.
Southwestern Sheet Metal
71-4 B-body

CtownRunner
GTX (RS)
Posts: 587
Joined: Wed May 05, 2004 9:48 pm
Location: Cleveland, the North Coast

Post by CtownRunner » Sat Mar 08, 2008 4:01 pm

PB blaster= penitrating juice. WD 40 or other.

Ball Joint socket for sure. Shop can press out and in the new bushings. I would buy the tool and have it forever if the cost is close the the shop $.

I just wire brushed and spray painted the parts like control arms when I had them off. Wish I had sand blasted them first Oh well.
Image

72Rdrnner
GTX (RS)
Posts: 277
Joined: Thu Oct 26, 2006 6:42 am
Location: Bossier City, Louisiana

Lower control arm bushing & saft installation tools

Post by 72Rdrnner » Sat Mar 08, 2008 10:55 pm

Here's a "tool" I made to put the bushing and shaft for the lower control arm in. The shaft goes through the K frame to hold it in place, and the front end of the torsion bar then slips into the hex socked on the lower control arm.

Simply two pieces of pipe. Cut to the right length to fit over the shaft, ends filed smooth and square. (I painted them too) One slides inside the other. The smaller one pushes the shaft into the buishng. The large one pushes the busing & shaft assembly into the lower control arm. I have a hydraulic press which I used to apply the "muscle".

Image

This picture shows how the smaller diameter "tool" fits the shaft and how it then fits into the bushing.

Image

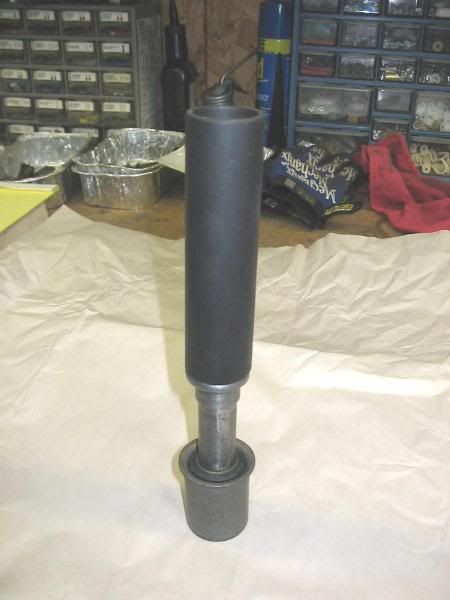
This picture shows how the larger diameter "tool" fits down over the shaft and contacts the bushing so it can be pushed into the lower control arm.

Image

I bought the upper ball joint installation socket at my local parts store. Only catch, it uses a 3/4 inch drive.

For the tie rod ends I used my regular front end puller OTC set.

Hope this helps get you headed in the right direction.

FYI either the facory tools were not available when I did mine or I just didn't know they were...at any rate, that's why I made these. From what I understand now, and what has been posted you can buy all the genuine factory tools now.
Image

Righteous One Owner '72 Roadrunner

Post Reply