Page 1 of 1

Brake Booster Connection problem

Posted: Wed Feb 21, 2007 2:30 pm
by 72GY9Runner
Well... here I go again. :(

Last night I figured I'd get all the brakes hooked back up and bled. So I install all of the parts, and get everything basically ready to go except for hooking up the pedal to the booster. I crawl under the dash and very quickly realize, I am missing something.

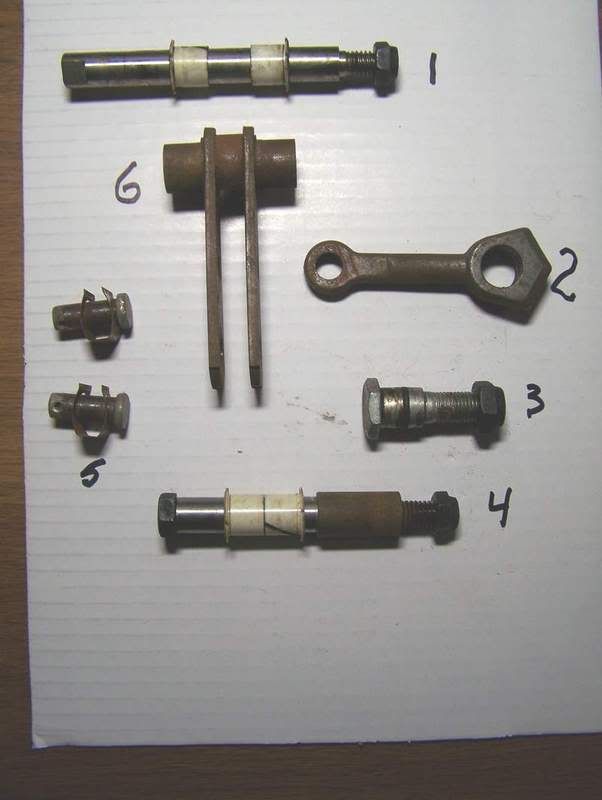
There is supposed to be a pivot assembly between the booster strut rod, and the brake pedal. But since the booster was in the trunk when I got the car, it appears that somebody lost it. I figured this would be no problem, and ran out to an Aspen I have for spare parts, and as luck would have it, there was the pivot. So back home I go.... (can you see this coming?).
When I install this pivot, everything seem to work but my pedal height is about 10 inches to high. :cry:

So... here's my question.

Does anyone have a picture of the proper pivot, or know what cars might use the same one? The area I live in does not exactly have a large collection of these cars sitting around for parts.

Would the pivot be the same on a 4 speed car? I know where there is a wrecked 4 speed Charger.

Dave

Re: Brake Booster Connection problem

Posted: Thu Feb 22, 2007 1:22 am
by 72Rdrnner
72GY9Runner wrote: Does anyone have a picture of the proper pivot, or know what cars might use the same one? The area I live in does not exactly have a large collection of these cars sitting around for parts.

Would the pivot be the same on a 4 speed car? I know where there is a wrecked 4 speed Charger.

Dave
I have a couple of those out in my stash of extra parts. Think I got one of a 1976 Sport Fury and the other I don't know. Let me dig them out tomorrow and I'll take a pix and post it. I might be able to get one up under my steering column too of the installed unit.

There are also some nylon busings on them. I think the whole idea was to increase the pedal force against the brake boost diaphram. The pivot adds a degree of leverage to do just that.

For now, heres a diagram out of my parts manual.

Image

Hope this helps.

Posted: Thu Feb 22, 2007 11:31 am
by 72GY9Runner
The pic you just posted is perfect. I can see exactly what the difference is.
The lever I took from the Aspen is curved, which is pushing the pedal height way up, where from the picture I can see that the correct one is just flat.

My father is a machinist, so I'll just have him make me up a new one, I think. I can hopefully use the pins and the main strut rod out of the Aspen one if the length is ok.

If you have one out of the car, can you measure the length of the rod from the brake pedal to lever for me? A measurement from the center of the mounting bolt to the center of the pin on the level if you please.

Thanks again,

Dave

Posted: Fri Feb 23, 2007 10:34 am
by 72Rdrnner
72GY9Runner wrote:If you have one out of the car, can you measure the length of the rod from the brake pedal to lever for me? A measurement from the center of the mounting bolt to the center of the pin on the level if you please.

Thanks again,

Dave
Sure no problem. I'll get it out, measure it, and get some pix with it on a white background with the various measurements indicated.

I'll do both the lever (5-100-89) and rod (5-100-20) in the diagram.

If you have an email address PM me with it and I can send the pix directly to you. This is advantageous as I can send a much larger pix which is handy for zooming in to see the details.

Power Brake Linkage Assembly Pix & Dimensions

Posted: Fri Feb 23, 2007 6:31 pm
by 72Rdrnner
72GY9Runner wrote:My father is a machinist, so I'll just have him make me up a new one, I think. I can hopefully use the pins and the main strut rod out of the Aspen one if the length is ok.

If you have one out of the car, can you measure the length of the rod from the brake pedal to lever for me? A measurement from the center of the mounting bolt to the center of the pin on the level if you please.

Thanks again,

Dave
Ask and yea shall receive. I'm trying some new stuff with Photobucket to make thumbnails that can be expanded so bear with me. You click on the thumbnail and they will get BIG! After you make them bigger, eventually you will get an expand button in the lower right. Click on that and they go to full size. (800x600)

This assembly came off of a 1976 Plymouth Fury I found in a local junk yard about three years ago. Four door sedan with dual chrome racing mirrors with remote adjust on the driver door! Needless to say, I now have those cherry mirrors about 500 assorted other parts. I just found a 1973 Dodge Pickup in the same junkyard and I'm going to see what it has. First examination looks like an 8 ¾ rear end, but have to check numbers! If it has this same brake linkage setup I can pull it for you. Cost will be my cost, shipping, and the cost of two cases of Coors Light! ($35 US +/-) I do work for beer!

The first image shows the dimensions of the holes and their spacing. The spacing is measured from inside to inside so all you have to do in order to get the center to center is add the dimension of one hole.

Oops I missed the inside to inside dimension of the lage hole in the top piece. It is .960

NOTE: all dimensions in inches.

Image

The second image shows all the parts. #3 is the bolt that goes through the big end of #2 and then through a hole in the brake pedal. It goes in the middle hole of the linkage, held there by a pin and with a spring clip on it. (#5) The pin is held in the linkage with a cotter pin. (not shown)

I think #1 pin goes through the large hole in #6 and is what attaches it to the frame between the dash and the firewall. I think #4 pin is what attaches the top of the brake pedal to the same frame. I may have that backward, but it's obvious when you put it together.

The end hole (small one) in #6 is the one the link from the brake booster will attach to. It uses the exact same pin/clip/cotter pin as the other small hole.

Image

Hope this all works, the Photo bucket stuff that is. All images are 800x600 however I took them in 2800x2200 so if you need the really big ones, I need your email address.

Posted: Mon Feb 26, 2007 12:34 pm
by 72GY9Runner
This is great! The expansion button worked too. It looks like most of the aspen parts were the same dimensions, excet the pivot. I think we can knock one off pretty quick, but I'll definitely let you know if I need one.

Thanks again,

Dave