72 Radio upgrade info

Technical Question and Answer - On topic to 71-74 Plymouth B-bodies only.

Moderator: Site Administrators

Post Reply
User avatar
72RoadRunnerGTX
GTX (RS)
Posts: 594
Joined: Wed Dec 27, 2006 6:44 pm
My Cars: 1972 Road Runner/GTX
1972 Satellite Sebring
1972 Satellite Sebring(big block parts car)
Location: Seattle, Washington

72 Radio upgrade info

Post by 72RoadRunnerGTX » Sun Feb 22, 2009 6:01 pm

The problem; How to get a more modern radio into one of these cars without cutting up the rallye dash bezel and keeping somewhat of an original appearance. As a response to several inquires for more detail here is my story of the path I took. I picked up two used Mopar electronic radios off of ebay. One was an AM/FM cassette deck 4-channel amp section and the other an AM/FM radio 2-channel amp. I may be into both radios all of $40 or so. Both newer radios are of similar design, the 4-channel radio chassis was used for the conversion while the 2-channel version was used for spare parts and as a test bed (I could probe around on its board while powered up and not be too concerned).
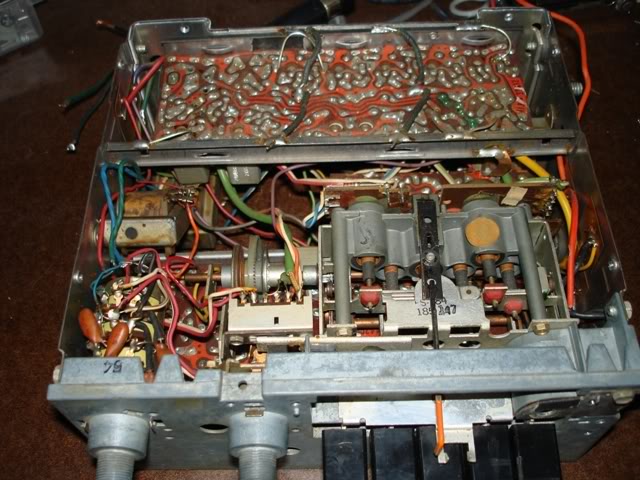
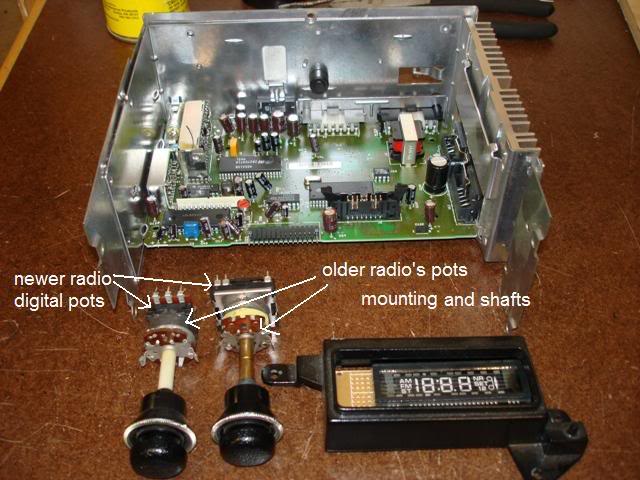
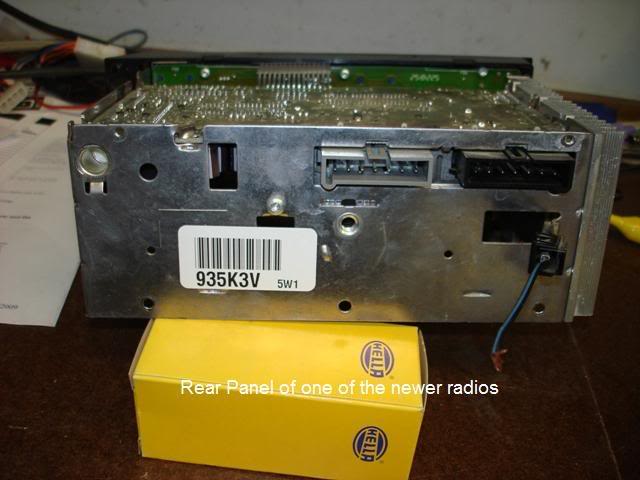
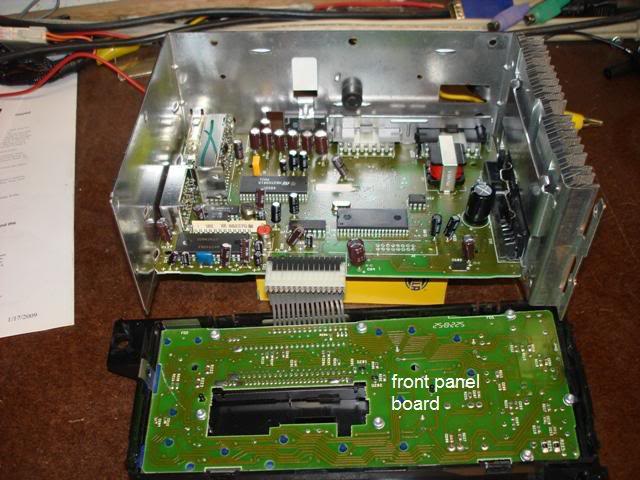
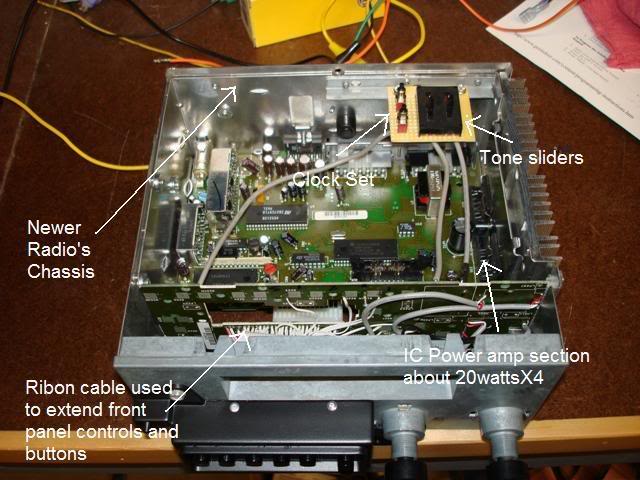
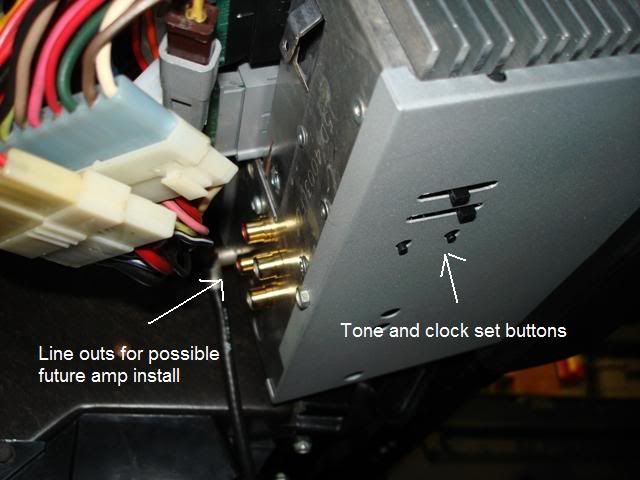
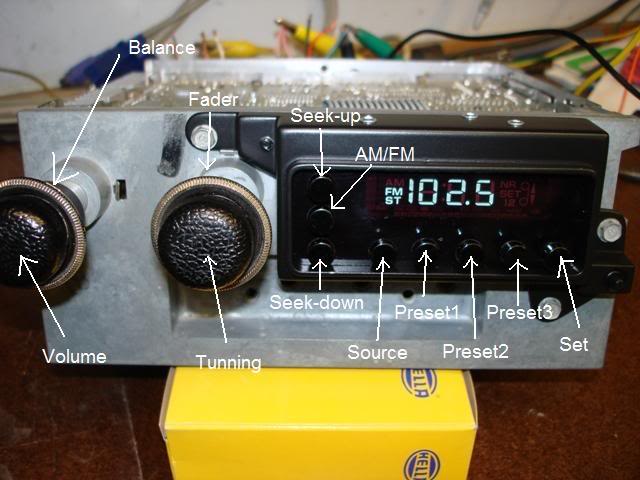
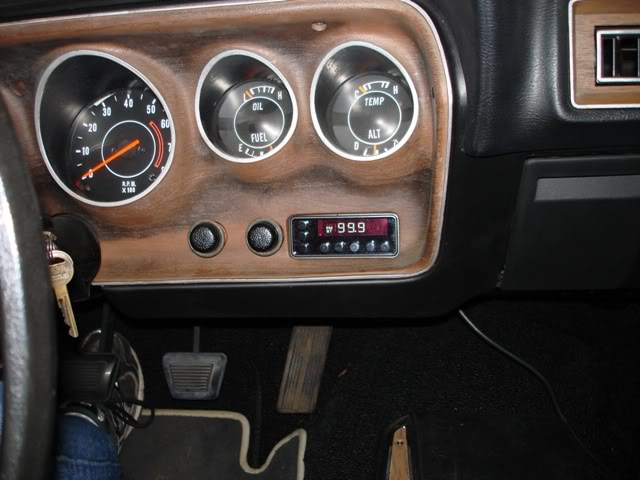
Starting with one of my original AM radios I fitted the newer 4-channel chassis into the chassis of the older AM radio, sectioning out one side for the heat sink. The front panel circuit board on the newer radio was removed from its faceplate. The shafted controls and florescent display was removed from the board. The potentiometers (volume/balance/tone/tune controls) from the old radio were disassembled and the newer pots were mechanically grafted to the older pots housings to retain the mounting points in the chassis and original knobs. Left control is volume and balance while right is tune and fader. The florescent display was relocated off its original front panel circuit board and bush buttons needed to be installed to control the rest of the newer radios functions. Not enough room to mount the tone control/clock set buttons on the front panel so they will protrude out the bottom of the radio. I should be able get to them under the dash. The push buttons are commercial grade and were the only specialized parts I needed to order for this project. The two button switches that can be seen for clock set are the same as what was used at the front panel. The button switches and display were mounted to a generic circuit board fitted inside the old radios head. A lens was fabricated from some old VCR parts I had kicking around the garage. Line outputs were added in the event I decide to add some amplification at some point down the road.
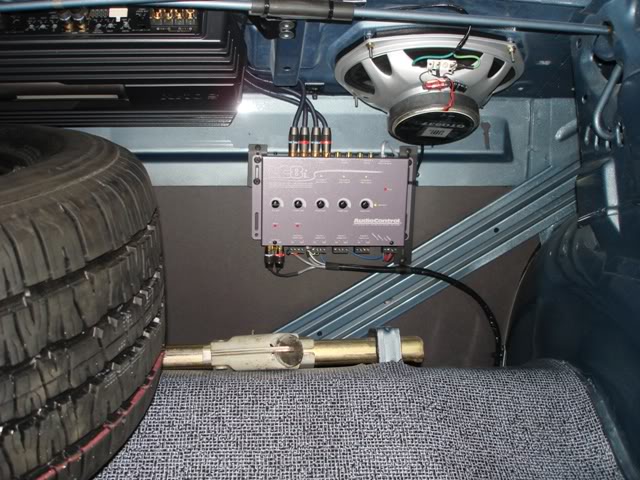
Here are some more pictures, hope it answers some questions. To those who may not have an electronics background, it may look more complex than it really is. So far pretty pleased with the outcome, it does sound good.

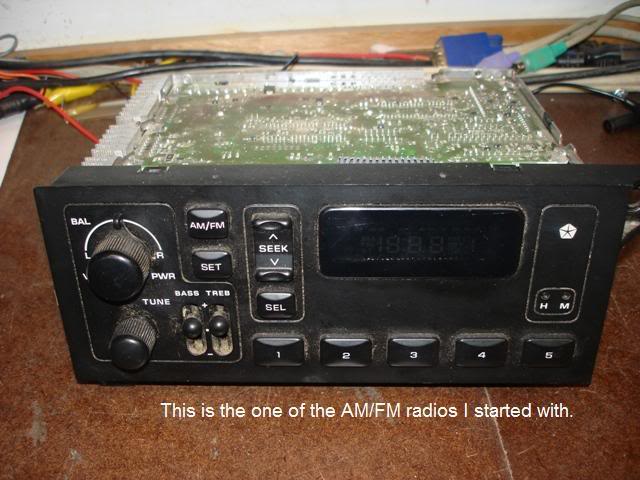
Oringinal AM/FM stereo with cassete din plug
Image
Image
Image
Image
Image
Image
Image
Image
Image
Last edited by 72RoadRunnerGTX on Sat Jul 15, 2017 2:12 am, edited 4 times in total.
Image

User avatar
Serious Satellite
GTX (RS)
Posts: 559
Joined: Mon Jan 22, 2007 11:44 pm
My Cars: 1973 Plymouth Roadrunner (R.I.P.) totalled by my younger brother
1974 Plymouth Satellite Coupe (R.I.P.) sold to my other brother, died an ignoble death
1974 Plymouth Satellite Sebring (Rusted In Place) sent to crusher
1984 Dodge Ram Prospector D250, 360 ci engine, hooker headers, edelbrock 4 barrel carb, 1991 grill replacement
Location: Warsaw, Indiana and Dayton, Ohio...

Re: 72 Radio upgrade info

Post by Serious Satellite » Mon Feb 23, 2009 3:00 pm

ya know, I still don't know what the heck you did! :shock:

I think when it comes down to it, I'll just take this post to the local radio repairman and say. . .do this! :beer:

LOL

Ron_M
Satellite Coupe (RL)
Posts: 21
Joined: Thu May 20, 2004 12:22 pm
Location: Connecticut

Re: 72 Radio upgrade info

Post by Ron_M » Mon Feb 23, 2009 8:06 pm

I got a pretty good idea but would also like to know where you "tapped in" for the line outs and it almost looks like the modern chassis with the vintage front. If you swapped everything over to the vintage chassis then I can see using the mounting points to mount to the dash frame.

The display from the modern unit is real close in size to the tuner display area of the vintage, yet the push button functions would not fit.

Is the morphing of the shafted controls difficult or "wait and see and you'll see it" type of deal?

Are schematics needed or even available?

I probably have the same type of modern radio (and to think I was gonna toss it, glad I kept it).

Can't wait for spring I really want to try this.

Thanks again for sharing!

User avatar
rr6pak
GTX (RS)
Posts: 1007
Joined: Sun Jan 30, 2005 10:29 pm
My Cars: 1971 Tor-Red RR
Location: USA

Re: 72 Radio upgrade info

Post by rr6pak » Tue Feb 24, 2009 5:32 am

Serious Satellite wrote:ya know, I still don't know what the heck you did! :shock:

I think when it comes down to it, I'll just take this post to the local radio repairman and say. . .do this! :beer:

LOL
Or BRIBE you to convert our radios like you did :D

User avatar
72RoadRunnerGTX
GTX (RS)
Posts: 594
Joined: Wed Dec 27, 2006 6:44 pm
My Cars: 1972 Road Runner/GTX
1972 Satellite Sebring
1972 Satellite Sebring(big block parts car)
Location: Seattle, Washington

Re: 72 Radio upgrade info

Post by 72RoadRunnerGTX » Tue Feb 24, 2009 4:22 pm

The 2 IC based power amps onboard have line level inputs to them; it was just a matter of probing around on their leads to identify them. FYI, one IC amp powers the front channels while the other powers the rear. The 2-channel radio uses the same circuit board as the 4-channel radio but the second amp IC is omitted. I'm sure schematics exist somewhere for all these radios (and I could have used them) but as old as all this stuff is locating them proved too difficult for me. Back in the old days there were radio repair shops everywhere, they usually had access to this info.

All of the newer radio's internal components including almost all of the rear panel and heatsink are contained within the chassis of the older radio, allowing for all the original mounting points to the dash.

As far the pots go, that may be the most challenging part of the entire mod; it will require miniature mechanical skills. I'm not a watchmaker but I did build a lot of models as a kid. If you are going to have a fader and balance controls you will need the original stacked pots from one of the vintage AM/FM stereo radio or the volume/tone control from two vintage AM radios. I pinned the trimmed long shafts of the old radio to the shorter shafts on the newer pots. Then fitted the extended shaft into the modified outer sleeves for the outer knobs. When I was happy with the function the two housings were JB welded together. Kind of hard to visualize I'm sure, unfortunately I don't have any pictures of this detail.

I considered trying to retain the original push buttons but found the mechanism needed to support the long throw of these buttons took up too much room in the chassis and directly interfered with where the control panel circuit board needed to be mounted.

Bribed to do it again? One of the things I have purposely not done with this restoration project is keep track of how much of my time it has consumed; I fear it would alarm me to know. This is not a quick mod, be fore warned.
Last edited by 72RoadRunnerGTX on Thu Nov 27, 2014 2:08 pm, edited 2 times in total.
Image

User avatar
72RoadRunnerGTX
GTX (RS)
Posts: 594
Joined: Wed Dec 27, 2006 6:44 pm
My Cars: 1972 Road Runner/GTX
1972 Satellite Sebring
1972 Satellite Sebring(big block parts car)
Location: Seattle, Washington

Re: 72 Radio upgrade info

Post by 72RoadRunnerGTX » Sun Feb 28, 2010 11:37 pm

Finally finished up the sound system this week-end. In another example of theoretical bench top engineering not working out perfectly in the real environment, the line-out taps I added to the later radio proved to be a miss-match with the true line level IPod adapter. As well, it appears the radio has an active cross-over of some kid built into the front/rear outputs, not getting full range from either. Mid/highs out the front and mid/lows out the rear. The solution was to revert back to the speaker level outs and using a AudioControl signal processor/OEM interface. Front/rear speaker level Input frequencies are summed together to provide a clean full range line level output with an auxiliary input (IPod), remote switching/level control, and full level adjustments for all pre-outs.
Adding an amplifier required fabing up some brackets to mount up and out of the way, retaining the full size spare tire. I then needed to set up the amp's (Sony 70wRMS x4) high pass filter on the front side to keep the bass away from the JBL 3 ½" two-way dash speakers, full range to the rear JBL three-way 6x9's.

Other electronic additions finally completed include the Innovate Motorsports LC-1 wideband O2 sensor, XD-16 display and a custom built electronic RPM limiting/throttle position A/C compressor cutout system. For the few times in the summer I get the urge to throttle up a bit forgetting the A/C is on. Consisting of two parts, first a RPM activated switch/circuit (used primarily for up shift lights) set at about 3k to open a relay in turn, the clutch control lead and a micro switch set up on the center carb to also open the clutch control at any throttle position other than idle and cruise.
Image
Image
Image
Image
Image
Last edited by 72RoadRunnerGTX on Sat Jul 15, 2017 2:13 am, edited 5 times in total.
Image

pats71
GTX (RS)
Posts: 165
Joined: Thu Mar 12, 2009 5:13 pm

Re: 72 Radio upgrade info

Post by pats71 » Mon Mar 01, 2010 2:46 pm

I'm gonna be sending out my AM/FM unit to the same guy my dad sent his. I forgot exactly who it was (I'll find out) but he sent his 67' AM/FM unit and the guy when through it and did a complete restoration and was also able to wire in a ipod/mp3 jack that when you plug it in, the mp3 connection in the radio detects it and turns off the radio itself and plays the songs without the presence of a switch.
1971 Plymouth Roadrunner
383/4 speed/Air Conditioning
Image

rthrbfishn
Satellite Sebring (RH)
Posts: 72
Joined: Wed Nov 03, 2004 3:14 pm
My Cars: 1971 GTX
Location: NW

Re: 72 Radio upgrade info

Post by rthrbfishn » Thu Mar 04, 2010 1:06 am

I have decided to run a "headless" stereo in my GTX. I just use an 1/8 to rca cable that I leave in the cubby of the center console when not in use, I had to drill a small hole and grommet to accomodate. rca plugs straight into amp. works wonderful! My mp3 also has an FM tuner.
Just curious, whats the O2 sensor for?
1971 GTX 440
1967 Barracuda 383 Fmla S

User avatar
72RoadRunnerGTX
GTX (RS)
Posts: 594
Joined: Wed Dec 27, 2006 6:44 pm
My Cars: 1972 Road Runner/GTX
1972 Satellite Sebring
1972 Satellite Sebring(big block parts car)
Location: Seattle, Washington

Re: 72 Radio upgrade info

Post by 72RoadRunnerGTX » Thu Mar 04, 2010 3:08 am

rthrbfishn wrote:Just curious, whats the O2 sensor for?
What? doesn't it look cool? Seriously, to assist in fine tuning the carbs and to continue to monitor their performance. I've deviated significantly from stock with my engine components making tuning and jetting choices little more than guess work, really need to see what's going on in real time. Have already re-jetted once and is running better now than it ever has.
The I-Simple IPod adapter I'm using connects through the bottom connector of the IPod and powers/charges as well as providing a fixed line level out. It also has an additional head phone type jack for inputting other sources, I too have them routed to inside the console glove compartment.
Image

Elvad
GTX (RS)
Posts: 108
Joined: Thu Aug 06, 2009 5:40 pm

Re: 72 Radio upgrade info

Post by Elvad » Thu Mar 04, 2010 7:39 pm

That is very cool, nice work! Unfortunately, some one hacked my radio out long before I got the car. I was just going to hook my iPod directly to an amp.

rthrbfishn
Satellite Sebring (RH)
Posts: 72
Joined: Wed Nov 03, 2004 3:14 pm
My Cars: 1971 GTX
Location: NW

Re: 72 Radio upgrade info

Post by rthrbfishn » Sat Mar 06, 2010 1:04 am

I see the air/fuel gauge now. That would be handy for sure.

are you running any front speakers? I was considering cutting the kick panels for 5 1/4's
1971 GTX 440
1967 Barracuda 383 Fmla S

User avatar
72RoadRunnerGTX
GTX (RS)
Posts: 594
Joined: Wed Dec 27, 2006 6:44 pm
My Cars: 1972 Road Runner/GTX
1972 Satellite Sebring
1972 Satellite Sebring(big block parts car)
Location: Seattle, Washington

Re: 72 Radio upgrade info

Post by 72RoadRunnerGTX » Sat Mar 06, 2010 1:34 am

Two JBL 3 1/2" coaxial speakers mounted to an old modified original 4x10 speaker frame. Not a whole lot of separation or bass response but I didn't want to cut anything. Angled outward slightly, tiring to get some separation for the reflected sound off the windshield.
Image
Last edited by 72RoadRunnerGTX on Sat Jul 15, 2017 2:13 am, edited 1 time in total.
Image

rthrbfishn
Satellite Sebring (RH)
Posts: 72
Joined: Wed Nov 03, 2004 3:14 pm
My Cars: 1971 GTX
Location: NW

Re: 72 Radio upgrade info

Post by rthrbfishn » Sat Mar 06, 2010 10:39 am

good idea.
I might try some mounted under the dash, pointed down. I hate to cut anything too. kick panels are cheap though.
1971 GTX 440
1967 Barracuda 383 Fmla S

Post Reply