A few updated pictures of the chicken

General Mopar Related Conversation

Moderator: Site Administrators

User avatar
road chicken
GTX (RS)
Posts: 668
Joined: Thu Oct 09, 2003 11:21 pm
Location: SE WI

A few updated pictures of the chicken

Post by road chicken » Sat Sep 20, 2014 4:19 pm

Nothing major. Added the strobe stripes, set the front end low and added some gauges on the hood. Really made it POP though. Enjoy. ( excuse my fat finger in photo 1 :oops:
Image

Image

Image

Image

Image
4th generation B bodys- there is no substitute.
68 383, Street Demon 750, RPM top end,484/284/108 poo poo cam "-5 spd 4:10 SG, 4whl disk, Helwig Anti-Sway, Poly bushings,Firm Feel Box, HD Linkage, 1" t-bars, 7 leafs Springs

71Satellite98661
GTX (RS)
Posts: 280
Joined: Sun Apr 21, 2013 7:14 pm
My Cars: 71 Satellite
70 Challenger
07 300C SRT8
13 Ram C/V (Caravan) work-issued
Location: Vancouver, WA

Re: A few updated pictures of the chicken

Post by 71Satellite98661 » Sat Sep 20, 2014 9:23 pm

Nothing major?! Man, those strobe stripes MAKE that black car! Very nice.

:beer:

71Satellite98661
GTX (RS)
Posts: 280
Joined: Sun Apr 21, 2013 7:14 pm
My Cars: 71 Satellite
70 Challenger
07 300C SRT8
13 Ram C/V (Caravan) work-issued
Location: Vancouver, WA

Re: A few updated pictures of the chicken

Post by 71Satellite98661 » Sat Sep 20, 2014 9:27 pm

There is something to be said about clipping a photo to draw the eye but I've got to ask...were all of these intentional? :wink:

By the way, those spoilers on a black car are 10x as cool as a colored car :beer:

User avatar
road chicken
GTX (RS)
Posts: 668
Joined: Thu Oct 09, 2003 11:21 pm
Location: SE WI

Re: A few updated pictures of the chicken

Post by road chicken » Sat Sep 20, 2014 9:42 pm

71Satellite98661 wrote:There is something to be said about clipping a photo to draw the eye but I've got to ask...were all of these intentional? :wink:
Just in case you're not kidding. right click on the picture and choose "view image" for the full picture. AND Thanks. Shes got just a little attitude about her. :D
4th generation B bodys- there is no substitute.
68 383, Street Demon 750, RPM top end,484/284/108 poo poo cam "-5 spd 4:10 SG, 4whl disk, Helwig Anti-Sway, Poly bushings,Firm Feel Box, HD Linkage, 1" t-bars, 7 leafs Springs

User avatar
road chicken
GTX (RS)
Posts: 668
Joined: Thu Oct 09, 2003 11:21 pm
Location: SE WI

Re: A few updated pictures of the chicken

Post by road chicken » Sat Sep 20, 2014 9:49 pm

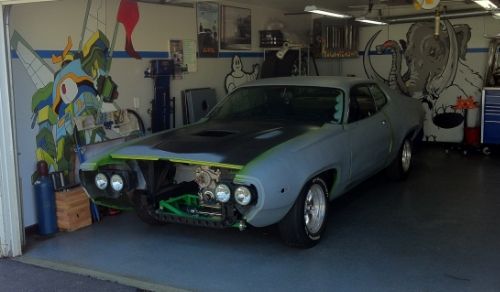
71Satellite98661 wrote: By the way, those spoilers on a black car are 10x as cool as a colored car :beer:

They actually work too. The handling at high speed is night and day. No floating around like it did without them. Who knew? I'm going to figure out a way to extend the front ones all the way across.
4th generation B bodys- there is no substitute.
68 383, Street Demon 750, RPM top end,484/284/108 poo poo cam "-5 spd 4:10 SG, 4whl disk, Helwig Anti-Sway, Poly bushings,Firm Feel Box, HD Linkage, 1" t-bars, 7 leafs Springs

Ronnman
Satellite Sebring Plus (RP)
Posts: 83
Joined: Wed Apr 25, 2007 9:43 pm
Location: Slidell, LA

Re: A few updated pictures of the chicken

Post by Ronnman » Sat Sep 20, 2014 10:02 pm

Nice touch. Looks great. What gauges did you use, what size? Any pics of them and the way you mounted them?
Ron

71Satellite98661
GTX (RS)
Posts: 280
Joined: Sun Apr 21, 2013 7:14 pm
My Cars: 71 Satellite
70 Challenger
07 300C SRT8
13 Ram C/V (Caravan) work-issued
Location: Vancouver, WA

Re: A few updated pictures of the chicken

Post by 71Satellite98661 » Sat Sep 20, 2014 10:16 pm

LOL! :lol: Your Photobucket photos are great! I didn't even try clicking on them.

Good to know about the spoilers. The boomerrangs; did that car have them originally? I've always wondered if it would be tricky to properly locate them on the valance w/o factory holes.

User avatar
road chicken
GTX (RS)
Posts: 668
Joined: Thu Oct 09, 2003 11:21 pm
Location: SE WI

Re: A few updated pictures of the chicken

Post by road chicken » Sat Sep 20, 2014 11:16 pm

Ronnman wrote:Nice touch. Looks great. What gauges did you use, what size? Any pics of them and the way you mounted them?
Ron
I used Autometer Competition series, 2 3/4" with the cups and mounting brackets. I will get pictures of the installation tomorrow after the football game. but basically I made aluminum plates the size of the base of the cup mount, drilled holes to match in the plates. Then made a sandwich of Cup base- thick foam, hood-( no holes lined up with the vent louvers)- thick foam- aluminum plate. and bolted the whole thing together. I had to tighten it more than I thought to stop them from vibrating. It works great and the foam protects the hood paint very well. Here is a pic. Excuse the dust and crappy paint job. :oops:
Image
4th generation B bodys- there is no substitute.
68 383, Street Demon 750, RPM top end,484/284/108 poo poo cam "-5 spd 4:10 SG, 4whl disk, Helwig Anti-Sway, Poly bushings,Firm Feel Box, HD Linkage, 1" t-bars, 7 leafs Springs

User avatar
road chicken
GTX (RS)
Posts: 668
Joined: Thu Oct 09, 2003 11:21 pm
Location: SE WI

Re: A few updated pictures of the chicken

Post by road chicken » Sat Sep 20, 2014 11:27 pm

71Satellite98661 wrote:LOL! :lol: Your Photobucket photos are great! I didn't even try clicking on them.

Good to know about the spoilers. The boomerrangs; did that car have them originally? I've always wondered if it would be tricky to properly locate them on the valance w/o factory holes.
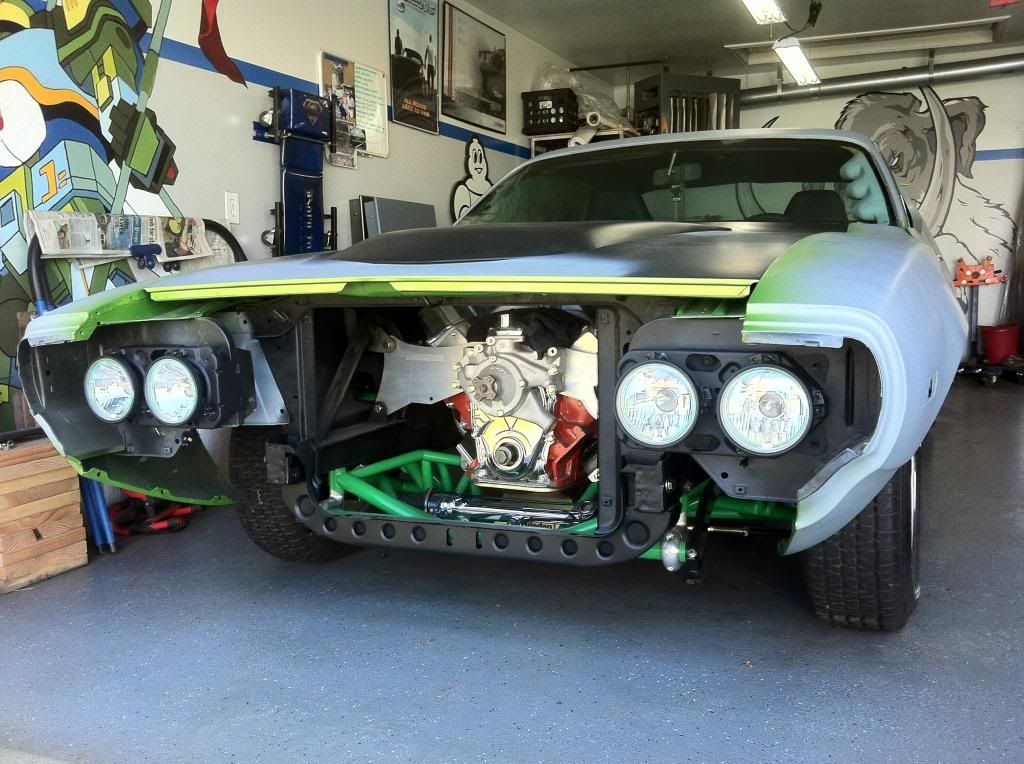
The car did not have these from the factory. These are also early reproductions in fiberglass and not very good at that, but it's what was available at the time. They are not located as the dealership would/should have installed them. I laid them flat and the factory would have them going up at an angle so the end close to where the body line turns up to form the wheel well. Look on the net there are plenty of pictures and you'll see it right away. As for fitting them, low adhesive masking tape is your best friend. You can play with it until you get the position right before committing to drilling holes. Someone here may even have posted the factory locating diagram, since I'm sure this is a common question. I'm going to work on a full width spoiler with a little more depth, a short splitter, and a little wider to cover the front tires. That ought to really clean it up at speed.
4th generation B bodys- there is no substitute.
68 383, Street Demon 750, RPM top end,484/284/108 poo poo cam "-5 spd 4:10 SG, 4whl disk, Helwig Anti-Sway, Poly bushings,Firm Feel Box, HD Linkage, 1" t-bars, 7 leafs Springs

User avatar
road chicken
GTX (RS)
Posts: 668
Joined: Thu Oct 09, 2003 11:21 pm
Location: SE WI

Re: A few updated pictures of the chicken

Post by road chicken » Sun Sep 21, 2014 4:47 pm

And the mounting:

Image

Image

Image

Image

That thin line of foam actually started out as about 7/16 thick high density on either side of the hood. That's why the long bolts. It crushed that much to hold it firm and not shake around.
4th generation B bodys- there is no substitute.
68 383, Street Demon 750, RPM top end,484/284/108 poo poo cam "-5 spd 4:10 SG, 4whl disk, Helwig Anti-Sway, Poly bushings,Firm Feel Box, HD Linkage, 1" t-bars, 7 leafs Springs

Ronnman
Satellite Sebring Plus (RP)
Posts: 83
Joined: Wed Apr 25, 2007 9:43 pm
Location: Slidell, LA

Re: A few updated pictures of the chicken

Post by Ronnman » Sun Sep 21, 2014 5:32 pm

Thanks for the pics, looks like a nice installation. I would not have thought you would need to tighten the mounting bolts so tight to keep the vibration down. Was the foam gasket soft or was it kind of hard material?
Ron

User avatar
road chicken
GTX (RS)
Posts: 668
Joined: Thu Oct 09, 2003 11:21 pm
Location: SE WI

Re: A few updated pictures of the chicken

Post by road chicken » Sun Sep 21, 2014 8:30 pm

Pretty firm. Almost like what you would find in the sole of a tennis shoe.
4th generation B bodys- there is no substitute.
68 383, Street Demon 750, RPM top end,484/284/108 poo poo cam "-5 spd 4:10 SG, 4whl disk, Helwig Anti-Sway, Poly bushings,Firm Feel Box, HD Linkage, 1" t-bars, 7 leafs Springs

dangina
GTX (RS)
Posts: 394
Joined: Sat Feb 12, 2011 12:28 am
My Cars: 71 roadrunner
Location: lethbridge, ab

Re: A few updated pictures of the chicken

Post by dangina » Thu Sep 25, 2014 1:01 pm

I love how low it sits!!!
400 stroked to 470ci, 3:55 Eaton true trac, slightly upgraded suspension lol

BUILD THREAD!!!! http://www.protouringmopar.com/showthread.php?796-1971-Speedipus-Rex&highlight=speedipus

User avatar
road chicken
GTX (RS)
Posts: 668
Joined: Thu Oct 09, 2003 11:21 pm
Location: SE WI

Re: A few updated pictures of the chicken

Post by road chicken » Fri Sep 26, 2014 4:31 pm

dangina wrote:I love how low it sits!!!
24" to the top of the wheel well opening. Stock is 27 in front. Rear is stock height. I have to be very slow when turning coming off a curb of the tires catch the wheel well trim. But once on level ground no problems. I Used Magnum force tubular upper arms and set it for -1 degree camber and +7 caster. Yeah is does give it a low stance. I have the satellite rocker trim that will go on for the final version. That ought to magnify the efFect even more
4th generation B bodys- there is no substitute.
68 383, Street Demon 750, RPM top end,484/284/108 poo poo cam "-5 spd 4:10 SG, 4whl disk, Helwig Anti-Sway, Poly bushings,Firm Feel Box, HD Linkage, 1" t-bars, 7 leafs Springs

User avatar
phatdak18
Road Runner (RM)
Posts: 36
Joined: Mon Jun 30, 2014 6:25 pm
My Cars: 72 Plymouth Roadrunner

Re: A few updated pictures of the chicken

Post by phatdak18 » Tue Oct 07, 2014 3:36 am

Im curious what you used to lower the car? im a fan of the Magnum Force products as well, got the complete setup myself. Even their "bolt in" 4 link.... which wasent haha, but thats a whole nother subject
MOPAR OR NO CAR!!!
Image

Post Reply