Startin to work on the Clone Runner (it's PAINTED!)

General Mopar Related Conversation

Moderator: Site Administrators

71Beeper
GTX (RS)
Posts: 694
Joined: Mon Dec 27, 2010 5:27 pm
My Cars: 1971 Satellite
Location: Stoney Creek Ontario Canada

Re: Startin to work on the Clone Runner (it's PAINTED!)

Post by 71Beeper » Sat Oct 14, 2023 7:47 pm

Good thing I have one of these I bought ages ago not thinking I was going to need it.
Oct 14th (18).jpg
Oct 14th (18).jpg (64.47 KiB) Viewed 324615 times
But - it has to be cleaned up and painted before it goes on.
So, take the fiber wheel to it and Voila....cleaned up.
Oct 14th (19).jpg
Oct 14th (19).jpg (55.51 KiB) Viewed 324615 times
Oct 14th (20).jpg
Oct 14th (20).jpg (82.03 KiB) Viewed 324615 times
Next is to get some primer and paint on it and install.

71Beeper
GTX (RS)
Posts: 694
Joined: Mon Dec 27, 2010 5:27 pm
My Cars: 1971 Satellite
Location: Stoney Creek Ontario Canada

Re: Startin to work on the Clone Runner (it's PAINTED!)

Post by 71Beeper » Sun Oct 29, 2023 4:12 pm

Got the dog bone bracket painted up and installed along with the shifter box and rods.
Oct 29th (9).jpg
Oct 29th (9).jpg (107.86 KiB) Viewed 324570 times
Oct 29th (10).jpg
Oct 29th (10).jpg (109.37 KiB) Viewed 324570 times
Oct 29th (6).jpg
Oct 29th (6).jpg (109.15 KiB) Viewed 324570 times
Also cleaned up the yoke and put it in the tailshaft as I'll be putting fluid in it next.
Oct 29th (1).jpg
Oct 29th (1).jpg (42.29 KiB) Viewed 324570 times
Oct 29th (4).jpg
Oct 29th (4).jpg (40.28 KiB) Viewed 324570 times

71Beeper
GTX (RS)
Posts: 694
Joined: Mon Dec 27, 2010 5:27 pm
My Cars: 1971 Satellite
Location: Stoney Creek Ontario Canada

Re: Startin to work on the Clone Runner (it's PAINTED!)

Post by 71Beeper » Sun Nov 19, 2023 5:25 pm

Today I wanted to get the shifter boot mounted.
Since I have a pistol grip handle that is designed to go into the bayonet style shifter box I have to mount the handle in the boot, then push the handle into the box.
But there was some difficulty in that, so I pulled out the isolator to see if all the bits were there.
Well, whoever had this shifter box before made a mess of trying to shove the handle in.
Nov 19th (1).jpg
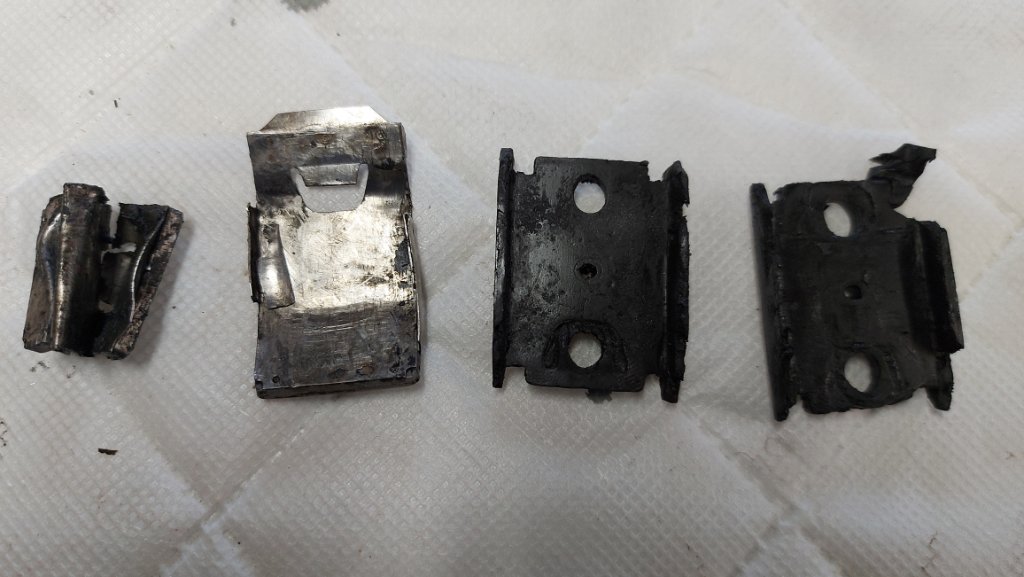
Nov 19th (1).jpg (86.69 KiB) Viewed 324454 times
Nov 19th (2).jpg
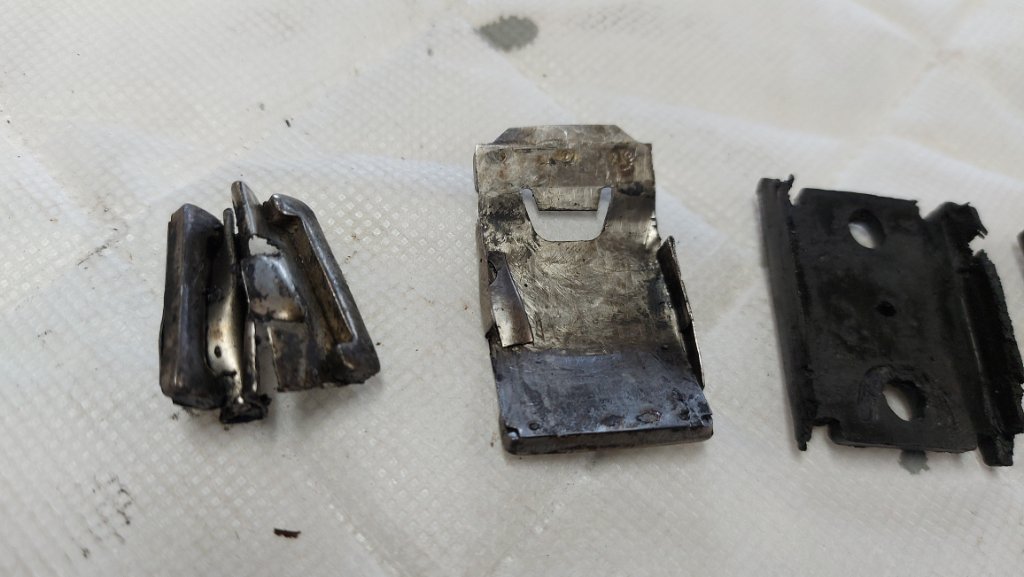
Nov 19th (2).jpg (78.3 KiB) Viewed 324454 times
The piece on the left is supposed to look like the one beside it.
That was in the bottom of where the handle gets mounted.
Whoever must have forced the handle so much that the plate got mangled and shoved to the bottom.
Anyway - got a new kit on order from Brewers.

Moving on to my Weld rims - the backside of them looked terrible.
Nov 18th (3).jpg
Nov 18th (3).jpg (123.77 KiB) Viewed 324454 times
Well, a little bit of spit and polish using this stuff.
Nov 18th (4).jpg
Nov 18th (4).jpg (55.93 KiB) Viewed 324454 times
They turned out like this..
Nov 18th (5).jpg
Nov 18th (5).jpg (121.98 KiB) Viewed 324454 times

71Beeper
GTX (RS)
Posts: 694
Joined: Mon Dec 27, 2010 5:27 pm
My Cars: 1971 Satellite
Location: Stoney Creek Ontario Canada

Re: Startin to work on the Clone Runner (it's PAINTED!)

Post by 71Beeper » Sun Nov 19, 2023 5:27 pm

Not bad - but not as nice as the front.
Nov 18th (2).jpg
Nov 18th (2).jpg (113.12 KiB) Viewed 324454 times
Next I bought these to put into the unused lugnut holes.
Nov 19 (4).jpg
Nov 19 (4).jpg (63.59 KiB) Viewed 324454 times
Here they are installed.
Nov 19 (5).jpg
Nov 19 (5).jpg (116.23 KiB) Viewed 324454 times
Finally, I put some temporary front tires on the car as it will be coming off the stands right after the steering column goes in.
Nov 19 (1).jpg
Nov 19 (1).jpg (93.89 KiB) Viewed 324454 times
Nov 19 (3).jpg
Nov 19 (3).jpg (96.94 KiB) Viewed 324454 times
They are some old Uniroyal Tiger Paws 225-70-15's on a 15x6.5 Rallye rims.
I had those tire on the back of my 1976 Volare Road Runner back in the day.
I do have Welds for the front - they are the narrow front runners.
I want to polish them up before they go on the car.

71Beeper
GTX (RS)
Posts: 694
Joined: Mon Dec 27, 2010 5:27 pm
My Cars: 1971 Satellite
Location: Stoney Creek Ontario Canada

Re: Startin to work on the Clone Runner (it's PAINTED!)

Post by 71Beeper » Sun Dec 10, 2023 5:11 pm

My shifter inserts finally arrived from Brewers.
Installed them along with the shifter.
Dec 10th (1).jpg
Dec 10th (1).jpg (101.86 KiB) Viewed 324347 times
But I thought I would glue the bottom ring to the bellows for ease of installation.
Dec 10th (3).jpg
Dec 10th (3).jpg (109.75 KiB) Viewed 324347 times
So, in the meantime I thought I would tackle getting my front runner Welds cleaned up.
I bought some of this after seeing a video on the product.
Dec 10th (5).jpg
Dec 10th (5).jpg (66.33 KiB) Viewed 324347 times
Followed the directions which say "spray on then rinse off with water".
Wow :shock: what a difference.
Here's one rim done (left one) vs the other one which is not done.
Dec 10th (4).jpg
Dec 10th (4).jpg (113.61 KiB) Viewed 324347 times
Then put some polish on both of them.
Dec 10th (10).jpg
Dec 10th (10).jpg (116.68 KiB) Viewed 324347 times
I'm happy with them now.

71Beeper
GTX (RS)
Posts: 694
Joined: Mon Dec 27, 2010 5:27 pm
My Cars: 1971 Satellite
Location: Stoney Creek Ontario Canada

Re: Startin to work on the Clone Runner (it's PAINTED!)

Post by 71Beeper » Sat Dec 23, 2023 9:02 pm

Well, Christmas came early for me.... :beer:
I was able to go over to my US mailbox and pick-up the new bench seat style shifter.
Shifter Screenshot 2023-12-14 183136.jpg
Shifter Screenshot 2023-12-14 183136.jpg (59.2 KiB) Viewed 323482 times
I think the E-Bay name was The Shifter Doctor who deals with Hurst Shifters as the invoice came to me from Hurst shifters LLC.
Got it home and wow!
Dec 23rd (1).jpg
Dec 23rd (1).jpg (62.62 KiB) Viewed 323482 times
Good thing the handle and bezel and bottom piece came from National Moparts the day before.
Dec 23rd (4).jpg
Dec 23rd (4).jpg (43.29 KiB) Viewed 323482 times
Here's a comparison from the smaller one and the taller one.
Dec 23rd (5).jpg
Dec 23rd (5).jpg (45.14 KiB) Viewed 323482 times
I just pushed it into the shifter box - I still have to screw down the shifter boot.
Dec 23rd (6).jpg
Dec 23rd (6).jpg (89.16 KiB) Viewed 323482 times

71Beeper
GTX (RS)
Posts: 694
Joined: Mon Dec 27, 2010 5:27 pm
My Cars: 1971 Satellite
Location: Stoney Creek Ontario Canada

Re: Startin to work on the Clone Runner (it's PAINTED!)

Post by 71Beeper » Sun Jan 07, 2024 5:24 pm

Got the shifter boot and trim ring installed.
Dec 24th.jpg
Dec 24th.jpg (136.6 KiB) Viewed 321365 times
The next step - lets stab in the steering column.
I got it set in place under the dash and this is what the other end looks like.
Dec 29th (1).jpg
Dec 29th (1).jpg (71.25 KiB) Viewed 321365 times
Dec 29th (3).jpg
Dec 29th (3).jpg (62.66 KiB) Viewed 321365 times
I think to myself easy peezy just have to push the coupler on to the steering box right??? WRONG :mad:
It wouldn't go on at all.
So upon further investigation it turns out the new coupler I bought is for a power steering box which has smaller splines.
No wonder it would not go on this steering box.
Luckily for me I have the coupler adaptor that goes from a power steering shaft to a manual box.
Put it on this coupler and try it again.
The result.....success!
Jan 7th (1).jpg
Jan 7th (1).jpg (86.35 KiB) Viewed 321365 times
Jan 7th (2).jpg
Jan 7th (2).jpg (74.71 KiB) Viewed 321365 times

71Beeper
GTX (RS)
Posts: 694
Joined: Mon Dec 27, 2010 5:27 pm
My Cars: 1971 Satellite
Location: Stoney Creek Ontario Canada

Re: Startin to work on the Clone Runner (it's PAINTED!)

Post by 71Beeper » Sun Jan 07, 2024 5:30 pm

Here's a tech tip.
Instead of using the roll pin to secure the adaptor to the steering box I used a 5/16 UNC stainless set screw.
Jan 7th (3).jpg
Jan 7th (3).jpg (55.84 KiB) Viewed 321365 times
I ran a tap down the opening and applied some blue Loctite on the set screw.
Jan 7th (4).jpg
Jan 7th (4).jpg (112.83 KiB) Viewed 321365 times
Done deal.
I plugged in the 2 wiring harness' from the column to the main wiring harness and finally put the ignition key into the cylinder.
Jan 7th (6).jpg
Jan 7th (6).jpg (83.02 KiB) Viewed 321365 times
I'm happy this hurdle was cleared.
On to other stuff, like installing the line-loc button.
Jan 7th (9).jpg
Jan 7th (9).jpg (109.08 KiB) Viewed 321365 times
Jan 7th (10).jpg
Jan 7th (10).jpg (206.21 KiB) Viewed 321365 times

71Beeper
GTX (RS)
Posts: 694
Joined: Mon Dec 27, 2010 5:27 pm
My Cars: 1971 Satellite
Location: Stoney Creek Ontario Canada

Re: Startin to work on the Clone Runner (it's PAINTED!)

Post by 71Beeper » Sat Jan 13, 2024 6:05 pm

A big day for me and the car today.
I finally got the ground cable hooked up for the battery.
Jan 13th (7).jpg
Jan 13th (7).jpg (140.46 KiB) Viewed 293219 times
And tried a few circuits - first, the low beams.
Jan 13th (1).jpg
Jan 13th (1).jpg (99.84 KiB) Viewed 293219 times
Jan 13th (2).jpg
Jan 13th (2).jpg (104.2 KiB) Viewed 293219 times
So far so good.
Side markers.
Jan 13th (3).jpg
Jan 13th (3).jpg (92.59 KiB) Viewed 293219 times
Jan 13th (4).jpg
Jan 13th (4).jpg (71.92 KiB) Viewed 293219 times
Okay, no issues there.

71Beeper
GTX (RS)
Posts: 694
Joined: Mon Dec 27, 2010 5:27 pm
My Cars: 1971 Satellite
Location: Stoney Creek Ontario Canada

Re: Startin to work on the Clone Runner (it's PAINTED!)

Post by 71Beeper » Sat Jan 13, 2024 6:10 pm

Next, the high beams.
Jan 13th (6).jpg
Jan 13th (6).jpg (87.59 KiB) Viewed 293193 times
Here's the dash lights.
Jan 13th (5).jpg
Jan 13th (5).jpg (60.81 KiB) Viewed 293193 times
Parking brake light works.
Jan 13th (8).jpg
Jan 13th (8).jpg (106.99 KiB) Viewed 293193 times
As does the reverse indicator.
Jan 13th (9).jpg
Jan 13th (9).jpg (50.05 KiB) Viewed 293193 times
The signals and 4 ways work as does the heater motor and wipers (all three speeds).
The only issue was the dome light - but that turned out to be a burned out 1004 light bulb.
And the BONUS......no smoke coming from any of the wires... :beer:

71Beeper
GTX (RS)
Posts: 694
Joined: Mon Dec 27, 2010 5:27 pm
My Cars: 1971 Satellite
Location: Stoney Creek Ontario Canada

Re: Startin to work on the Clone Runner (it's PAINTED!)

Post by 71Beeper » Sat Jan 13, 2024 6:15 pm

So the next step is to fit the tuff wheel canister.
Jan 13th (12).jpg
Jan 13th (12).jpg (106.33 KiB) Viewed 293169 times
And finally after all these years.....the tuff wheel. :D
Jan 13th (14).jpg
Jan 13th (14).jpg (107.59 KiB) Viewed 293169 times
With the dash lights on.
Jan 13th (15).jpg
Jan 13th (15).jpg (115.04 KiB) Viewed 293169 times
I turned the steering both ways lock to lock with no issues.
Now I'll be able to put her on the ground and move her to her side of the shop to make room for my Dart to go in there for the winter.

71Beeper
GTX (RS)
Posts: 694
Joined: Mon Dec 27, 2010 5:27 pm
My Cars: 1971 Satellite
Location: Stoney Creek Ontario Canada

Re: Startin to work on the Clone Runner (it's PAINTED!)

Post by 71Beeper » Sun Jan 14, 2024 8:16 pm

Last item to do from underneath the car while it is in 4x4 mode is to hook up a fuel filter.
Jan 14th (1).jpg
Jan 14th (1).jpg (54.17 KiB) Viewed 282102 times
Eventually I will need to fit a exhaust system up (it will have to wait for now).
So today I took her off the 4x4 mode.
She's on her own wheels and weight now.
Jan 14th (2).jpg
Jan 14th (2).jpg (97.58 KiB) Viewed 282102 times
Jan 14th (4).jpg
Jan 14th (4).jpg (85.68 KiB) Viewed 282102 times
Here's a comparison of the wide tires vs the skinny tires.
Jan 14th (6).jpg
Jan 14th (6).jpg (82.17 KiB) Viewed 282102 times
My list is getting shorter.
A few items to install in the engine bay like heater hoses and fuel line to the carb.
The fan and rad and shroud of course as well as the alternator.

71Beeper
GTX (RS)
Posts: 694
Joined: Mon Dec 27, 2010 5:27 pm
My Cars: 1971 Satellite
Location: Stoney Creek Ontario Canada

Re: Startin to work on the Clone Runner (it's PAINTED!)

Post by 71Beeper » Sat Feb 17, 2024 6:19 pm

It's now time to tackle the front seats and seat tracks.
I took them down from the attic and they look like this.
Feb 2nd (1).jpg
Feb 2nd (1).jpg (126.15 KiB) Viewed 189164 times
Feb 2nd (2).jpg
Feb 2nd (2).jpg (115.44 KiB) Viewed 189164 times
Feb 2nd (3).jpg
Feb 2nd (3).jpg (136.28 KiB) Viewed 189164 times
Feb 2nd (4).jpg
Feb 2nd (4).jpg (127.17 KiB) Viewed 189164 times
Feb 2nd (5).jpg
Feb 2nd (5).jpg (92.12 KiB) Viewed 189164 times

71Beeper
GTX (RS)
Posts: 694
Joined: Mon Dec 27, 2010 5:27 pm
My Cars: 1971 Satellite
Location: Stoney Creek Ontario Canada

Re: Startin to work on the Clone Runner (it's PAINTED!)

Post by 71Beeper » Sat Feb 17, 2024 6:21 pm

Had them soaking in the Evaporust for about a week to clean them up.
Then prep them for paint and shoot a coat of satin black.
Feb 3rd (1).jpg
Feb 3rd (1).jpg (59.09 KiB) Viewed 189156 times
Feb 3rd (2).jpg
Feb 3rd (2).jpg (70.71 KiB) Viewed 189156 times
Feb 3rd (3).jpg
Feb 3rd (3).jpg (38.43 KiB) Viewed 189156 times
Feb 3rd (4).jpg
Feb 3rd (4).jpg (40.78 KiB) Viewed 189156 times
Feb 3rd (5).jpg
Feb 3rd (5).jpg (42.54 KiB) Viewed 189156 times

71Beeper
GTX (RS)
Posts: 694
Joined: Mon Dec 27, 2010 5:27 pm
My Cars: 1971 Satellite
Location: Stoney Creek Ontario Canada

Re: Startin to work on the Clone Runner (it's PAINTED!)

Post by 71Beeper » Sat Feb 17, 2024 6:22 pm

They turned out not too bad.
Feb 4th (2).jpg
Feb 4th (2).jpg (120.75 KiB) Viewed 189156 times
Feb 4th (3).jpg
Feb 4th (3).jpg (106.67 KiB) Viewed 189156 times
Feb 4th (4).jpg
Feb 4th (4).jpg (104.29 KiB) Viewed 189156 times
Feb 4th (6).jpg
Feb 4th (6).jpg (97.37 KiB) Viewed 189156 times
Feb 4th (7).jpg
Feb 4th (7).jpg (88.59 KiB) Viewed 189156 times

Post Reply