Startin to work on the Clone Runner (it's PAINTED!)

General Mopar Related Conversation

Moderator: Site Administrators

71Beeper
GTX (RS)
Posts: 694
Joined: Mon Dec 27, 2010 5:27 pm
My Cars: 1971 Satellite
Location: Stoney Creek Ontario Canada

Re: Startin to work on the Clone Runner (it's PAINTED!)

Post by 71Beeper » Sat Feb 17, 2024 8:05 pm

Next - get the front seats down from the attic.
I acquired these seats from a guy who owns a 1971 green Satellite Sebring Plus. He said that his brother pulled them out of a car that was in a scrapyard in 1972! :shock:
They don't look bad for 53 year old seats.
Feb 4th (9).jpg
Feb 4th (9).jpg (116.55 KiB) Viewed 558 times
I took all the side cover hardware off.
Feb 4th (10).jpg
Feb 4th (10).jpg (110.35 KiB) Viewed 558 times
Then using a mini carpet steam cleaner and some shout liquid gave the seats 2 good cleanings.
Feb 13th (1).jpg
Feb 13th (1).jpg (53.78 KiB) Viewed 558 times
Feb 13th (2).jpg
Feb 13th (2).jpg (55.07 KiB) Viewed 558 times
While they were drying I had to repair one of the push buttons that was missing some hardware.
Feb 16th (2).jpg
Feb 16th (2).jpg (141.69 KiB) Viewed 559 times

71Beeper
GTX (RS)
Posts: 694
Joined: Mon Dec 27, 2010 5:27 pm
My Cars: 1971 Satellite
Location: Stoney Creek Ontario Canada

Re: Startin to work on the Clone Runner (it's PAINTED!)

Post by 71Beeper » Sat Feb 17, 2024 8:11 pm

Yesterday, I was able to get the passenger side seat installed.
Feb 16th (7).jpg
Feb 16th (7).jpg (105.25 KiB) Viewed 553 times
And earlier today finish it off with the driver side seat.
Feb 17th (2).jpg
Feb 17th (2).jpg (121.88 KiB) Viewed 553 times
Feb 17th (4).jpg
Feb 17th (4).jpg (138.34 KiB) Viewed 553 times
Feb 17th (7).jpg
Feb 17th (7).jpg (134.38 KiB) Viewed 553 times
Feb 17th (8).jpg
Feb 17th (8).jpg (152.16 KiB) Viewed 553 times

71Beeper
GTX (RS)
Posts: 694
Joined: Mon Dec 27, 2010 5:27 pm
My Cars: 1971 Satellite
Location: Stoney Creek Ontario Canada

Re: Startin to work on the Clone Runner (it's PAINTED!)

Post by 71Beeper » Sun Mar 10, 2024 3:59 pm

So now that the interior is complete - er.. | do have one more thing to install and that is the shoulder belts, but that can wait till summer.
Time to get the brakes bled.
Since everything is new (master cylinder and new stainless brake lines) I have to bleed the master first.
So. make up some lines to loop back into the master, like so..
Feb 26th (1).jpg
Feb 26th (1).jpg (97.07 KiB) Viewed 457 times
Now attach the proper lines and fill with DOT5 and start bleeding the system.
Well no sooner than I get started that I have a major FAIL!.... :mad:
My line-loc is leaking. So I figure I just need to snug up the fittings......nope, still leaks.
Now I have my clean catch can getting as much of the DOT5 as possible cause this stuff is $$$$.
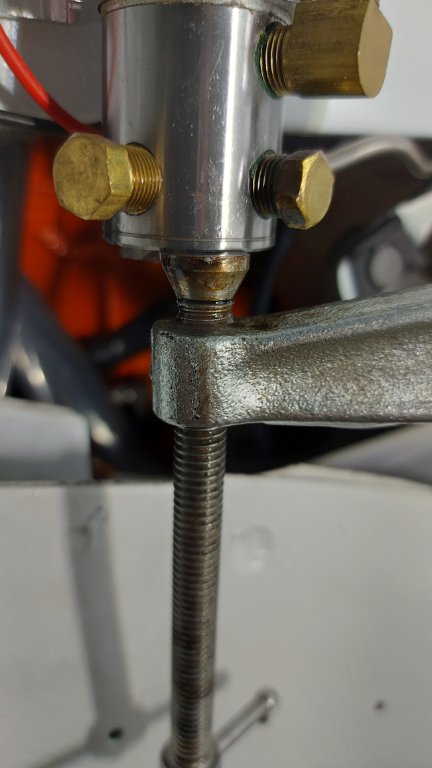
So I get my eyeballs right up to the unit for a closer look - it's leaking out of the main body near the bottom.
How can that be??? the cannister is a one piece matched unit.
So I get my c-clamp and try to clamp it up to see if it stops leaking.......nope.
Here's a pic of the line-loc with c-clamp on it.
Feb 26th (3).jpg
Feb 26th (3).jpg (54.2 KiB) Viewed 457 times
And here - the small horizontal slot just above where the clamp is sitting is where it is leaking from... :mad:
Feb 26th (4).jpg
Feb 26th (4).jpg (45.53 KiB) Viewed 457 times
So. I'm frustrated and done for the day. Go in the house and order up another line-loc.

71Beeper
GTX (RS)
Posts: 694
Joined: Mon Dec 27, 2010 5:27 pm
My Cars: 1971 Satellite
Location: Stoney Creek Ontario Canada

Re: Startin to work on the Clone Runner (it's PAINTED!)

Post by 71Beeper » Sun Mar 10, 2024 4:02 pm

So today is switching out the new line-loc.
Take the fittings off and the old one off the car.
Reverse order for the new one.
So far so good.
Mar 10th (2).jpg
Mar 10th (2).jpg (78.87 KiB) Viewed 457 times
I topped up the master and called it a day.
I'll keep an eye out till next weekend to check for any leaks.

71Beeper
GTX (RS)
Posts: 694
Joined: Mon Dec 27, 2010 5:27 pm
My Cars: 1971 Satellite
Location: Stoney Creek Ontario Canada

Re: Startin to work on the Clone Runner (it's PAINTED!)

Post by 71Beeper » Sat Mar 23, 2024 4:33 pm

As I finished up the line-loc install - stupid me noticed that I had plumbed the master cylinder backwards.... :mad:
So I had to make new lines and install them the proper way.
Like so.
Mar 17th (1).jpg
Mar 17th (1).jpg (107.85 KiB) Viewed 365 times
Mar 17th (2).jpg
Mar 17th (2).jpg (74.39 KiB) Viewed 365 times
Mar 17th (3).jpg
Mar 17th (3).jpg (99.07 KiB) Viewed 365 times
Sure it would have been easier if the thread sizes in the master were the same but no...... :cry:

71Beeper
GTX (RS)
Posts: 694
Joined: Mon Dec 27, 2010 5:27 pm
My Cars: 1971 Satellite
Location: Stoney Creek Ontario Canada

Re: Startin to work on the Clone Runner (it's PAINTED!)

Post by 71Beeper » Sat Mar 23, 2024 4:38 pm

So before I go and bleed the brake system once again I decided to change gears and install the universal joints on the driveshaft.
Here is the Moog part number for their heavy duty one with the grease fitting in the cap.
Mar 23rd (7).jpg
Mar 23rd (7).jpg (103.99 KiB) Viewed 365 times
Mar 23rd (8).jpg
Mar 23rd (8).jpg (63.13 KiB) Viewed 365 times
Clean up the bores before install.
Mar 23rd (5).jpg
Mar 23rd (5).jpg (36.03 KiB) Viewed 365 times
Install the joints.
Mar 23rd (9).jpg
Mar 23rd (9).jpg (84.11 KiB) Viewed 365 times
Mar 23rd (11).jpg
Mar 23rd (11).jpg (58.99 KiB) Viewed 365 times

71Beeper
GTX (RS)
Posts: 694
Joined: Mon Dec 27, 2010 5:27 pm
My Cars: 1971 Satellite
Location: Stoney Creek Ontario Canada

Re: Startin to work on the Clone Runner (it's PAINTED!)

Post by 71Beeper » Sat Mar 23, 2024 4:40 pm

Here's the finished driveshaft.
Mar 23rd (13).jpg
Mar 23rd (13).jpg (86.07 KiB) Viewed 365 times
Finally get the driveshaft installed.
Mar 23rd (14).jpg
Mar 23rd (14).jpg (49.07 KiB) Viewed 365 times
Mar 23rd (15).jpg
Mar 23rd (15).jpg (33.47 KiB) Viewed 365 times
Mar 23rd (17).jpg
Mar 23rd (17).jpg (92.87 KiB) Viewed 365 times

71Beeper
GTX (RS)
Posts: 694
Joined: Mon Dec 27, 2010 5:27 pm
My Cars: 1971 Satellite
Location: Stoney Creek Ontario Canada

Re: Startin to work on the Clone Runner (it's PAINTED!)

Post by 71Beeper » Sun Mar 24, 2024 4:08 pm

So today I try bleeding the brakes again.
Start at the passenger side rear & I notice it leaking from the tee that sits on the diff housing.
It's leaking from the fitting on the stainless braided flex line I got from Inline tube.
Mar 24th (1).jpg
Mar 24th (1).jpg (86.54 KiB) Viewed 345 times
So I'm now removing it - it's junk.
I'm ordering the stock flex line so I'll have no more headaches.
So lets move on and do something else.
Like install the heater hoses.
Mar 24th (4).jpg
Mar 24th (4).jpg (128.21 KiB) Viewed 345 times
Mar 24th (5).jpg
Mar 24th (5).jpg (119.39 KiB) Viewed 345 times
Mar 24th (6).jpg
Mar 24th (6).jpg (129.83 KiB) Viewed 345 times

71Beeper
GTX (RS)
Posts: 694
Joined: Mon Dec 27, 2010 5:27 pm
My Cars: 1971 Satellite
Location: Stoney Creek Ontario Canada

Re: Startin to work on the Clone Runner (it's PAINTED!)

Post by 71Beeper » Tue Apr 02, 2024 4:09 pm

While waiting for my flex lines to come in I cleaned up the rad and fan shroud.
April 1st (1).jpg
April 1st (1).jpg (52.07 KiB) Viewed 256 times
April 1st (2).jpg
April 1st (2).jpg (151.46 KiB) Viewed 256 times
The part number tells me this 22" rad came in 1972 340 cars.
Gave it and the shroud a spray paint.
April 1st (3).jpg
April 1st (3).jpg (135.25 KiB) Viewed 256 times
April 1st (4).jpg
April 1st (4).jpg (123.75 KiB) Viewed 256 times
April 2nd (2).jpg
April 2nd (2).jpg (59.22 KiB) Viewed 256 times

71Beeper
GTX (RS)
Posts: 694
Joined: Mon Dec 27, 2010 5:27 pm
My Cars: 1971 Satellite
Location: Stoney Creek Ontario Canada

Re: Startin to work on the Clone Runner (it's PAINTED!)

Post by 71Beeper » Tue Apr 02, 2024 4:12 pm

Go to install it.
Shroud first.
April 2nd (3).jpg
April 2nd (3).jpg (112.06 KiB) Viewed 255 times
Then the rad.
April 2nd (4).jpg
April 2nd (4).jpg (128.31 KiB) Viewed 255 times
Go to mount the shroud and oh oh, Houston we have a problem..... :mad:
April 2nd (5).jpg
April 2nd (5).jpg (117.08 KiB) Viewed 255 times
April 2nd (6).jpg
April 2nd (6).jpg (120.82 KiB) Viewed 255 times
April 2nd (9).jpg
April 2nd (9).jpg (69.07 KiB) Viewed 255 times
The o.d. of the fan touches the shroud.
I can't get the shroud mounted.
Are there more than one version of the 22" fan shroud?
Frustrating indeed.

71Beeper
GTX (RS)
Posts: 694
Joined: Mon Dec 27, 2010 5:27 pm
My Cars: 1971 Satellite
Location: Stoney Creek Ontario Canada

Re: Startin to work on the Clone Runner (it's PAINTED!)

Post by 71Beeper » Sun Apr 07, 2024 3:31 pm

So I did some investigating and it turns out that the shroud I have may be for a truck application.
The part number on the shroud is 2828288.
April 6th (7).jpg
April 6th (7).jpg (87.42 KiB) Viewed 191 times
So I ordered the correct one thru Brewers performance. I've bought enough 4 speed stuff from them and had no issues.
In the meantime, I installed the pinion snubber and the rubber rear flex line.
April 6th (1).jpg
April 6th (1).jpg (97.98 KiB) Viewed 191 times
Also got a chance to put in the fuel vent return line.
April 7th (1).jpg
April 7th (1).jpg (113.57 KiB) Viewed 191 times
April 7th (2).jpg
April 7th (2).jpg (79.23 KiB) Viewed 191 times
And on a good note I was successful in bleeding the brakes!! :beer:
No leaks and the pedal feels great.

Post Reply