finally a little green
Moderator: Site Administrators
-
mopardog

- Satellite Sebring Plus (RP)
- Posts: 81
- Joined: Sun Jun 02, 2013 10:50 pm
- My Cars: 1972 Road Runner 400 (project)
- Location: River Valley, Arkansas
Re: finally a little green
thanks for the info. Going to pick some up come payday.
Long live "Ma Mopar"!!! 1972 Road Runner F7 Green, E68, build Feb 9, 1972, Deluxe trim. She's a little rough but she's mine all mine!!!!!
Re: finally a little green
Well no snow temps above freezing so i went and spent some time with the car got my bumper resembled with some excellent tail lights i got from California the sockets were not even rusted no wiring repairs or anything. Now the car is completely wired and i think everything works as it should. The back sure looks better with all that new chrome.


Re: finally a little green
In December I ran the motor for the 20 minute break in period and posted that I had a substantial oil leak. Since then I have only been over to the car once and put my rear bumper assembly on. Well to be honest after having some trouble with the steering column installation, wiring/electrical power trouble shooting and then the oil leak I was burnerd out and disheartened. The very cold snowy winter we had didn't encourage me to spend any time at the unheated shed its in either so I have made no progress. However, I sent the car to a shop yesterday to get the oil pump leak fixed, and asked him to check out my clutch installation since I couldn't get it to release. They replaced the oil pump gasket and adjusted the pressure plate fingers and I picked it up tonight. Although the car doesn't have any glass or interior other than dash yet, I decided I was going to drive it home instead of paying for another tow. That 7 mile drive home really reignited my excitement. The motor runs good and pulls very hard, the trans shifts good, and even tested the sure grip once and left a couple nice tracks. The guy at the shop said almost everyone who has come by the garage the last two days had noticed the car and went over for a closer look and asked about it, these cars really do get a lot of attention, can't wait to get it done.
-
Magnes
- Satellite Sebring Plus (RP)
- Posts: 98
- Joined: Sun Jan 06, 2013 7:06 pm
- My Cars: 1972 Plymouth Satellite Sebring Plus - Rallye Red
1972 Plymouth Satellite Sebring - Green - Parts Car
1971 Plymouth Satellite Sebring - Tan - Location: Rosenberg, Texas
Re: finally a little green
It's going to be nice. It's easy to get bogged down when you are doing an entire car so I know what you mean. I try and keep myself to one thing at a time instead of looking at the car as a whole. This helps keep me motivated when I would otherwise get burned out. Focusing on one system or area and making daily goals.
Now when Winter comes around, it's a different story so I feel you there... I don't want to do anything at all and try to complete my major stuff by then so I can do smaller projects inside where it's nice and warm.
Your car is going to be really nice. You've done an exceptional job on it. I cannot wait to see it finished out.
Re: finally a little green
Now that I can drive it I took the car to an exhaust shop wednesday and had the mufflers welded in place, I had the clamped on but wanted them welded. Yesterday I spent the first part of the day bass fishing, then came home and cleaned up some interior panels. I used the interior paint the Herb's is selling and put on a few coats, as advertised it does not hide the grain, went on easy, and the color was good. Mine were already black just faded, but they turned out good I think. Today after church I put the carpet in that I purchased from Legendary it fit pretty good, a little funny around the hump however the bench seat humps are a little funny shaped in my opinion. After I had the carpet where I wanted it I put in my front seat that has been refoamed and recovered with a Legendary cover, and I scored an excellent set of original unsplit head rest to put in the seat. Also installed the shifter boot and the trim ring. The boot and ring I got from Brewers and am very disappointed that this $100 aftermarket bench seat boot has a split in it at the front seam already.


Re: finally a little green
Looks great! Nice to see one restored back to factory correct.
AKA Butterscotch71....the road runner nest is out to win you over this year!
Re: finally a little green
Thanks Eric for the compliment. When I first joined the nest 2 years ago after buying the car I put out a question asking if more folks recommend the oe style restoration or the restomod approach and most said oe style. I didnt really have a direction planned when I bought the car I just wanted to do a car and chose the 71 RR because noone brings any out in my area. I am glad I did this car oe style it has been fun learning, and now a couple years later I agree that more of these cars need to be out representing how cool looking the were 40 years ago. I cant wait to get the gold stripe and color matched wheels back on it, those were my two favorite things on my build sheet. before putting on painted wheels, I want to get it aligned with the rollers on it, in case the heads were to scratch the new wheel paint. Furthermore, I am going to need some paint touch up before I put decals on, a couple bad decisions while putting the car back together by myself have left me with some defects in the new paint.
Re: finally a little green
WOW, it looks awesome! I like the colour... 
"PRO RUNNER" 1971 Road Runner Pro Touring (GY9 Tawny Gold)
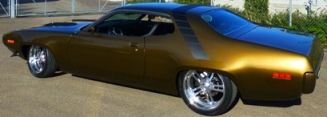
AERODYNAMIC IS FOR PEOPLE THAT CAN'T BUILD ENGINES!
AERODYNAMIC IS FOR PEOPLE THAT CAN'T BUILD ENGINES!
Re: finally a little green
I had the car aligned and the new tires mounted on the green wheels and put them on the car yesterday. I also made some new vapor barriers for the back side panels and put them in with some new string caulk. Furthermore, I mounted the lower sections of the rear panels along with installing the package tray, the rear seat along with a bunch of seat belts, and the kick panels. I had a door latch that was giving me some trouble locking and unlocking, but I was able to buy a replacement from Scott here on the Nest and also got that changed. I had hoped to get the headliner installed today but I used up the couple hours I had just trying to get the dome light fixture wiring fished back down the "A" pillar. If you are stripping your car all the way out like I did, do yourself a favor and when removing the wiring for that fixture tie a string to the end before you pull it out and then leave the string in place inside the "A" pillar until your ready to put it back then you can pull it through. I wish I had, it took a while for me to fish it out through the pillar.


Re: finally a little green
Today was my 12 year wedding anniversary, and this car was my gift for my 10 year hard to beleive i have had it two years and just got to driving it some a few weeks ago. It rained all day yesterday so I didnt do anything with it, however it was nice today so I spent a few hours on it after I did some things my wife wanted to do. I was able to get the headliner mostly installed, I havit it in and stretched rear to front and my dome light in but i still need the mirror, and visors in then stretch it side to side so I can install the trim. I did get the c pillar side to side stretched and finished putting in my rear door panels and sail panels. furthermore, I put the new amd windshield in today my original had a bb hole in it and when I cut the butyl loose it cracked from top to bottom. Originally my plan was to reuse it and get the bb hole fixed, guess I should have had it fixed before trying to remove it, tuff break. I have not put the trim back on yet because I purchased a polishing kit from eastwood and want to clean several years of grime off all the stainless before I put it back.


Re: finally a little green
I now have the whole interior in as well as all the glass, and I gave the car its first wash today. I am going to try and have a couple spots touched up this week to repair some places I damaged the paint during reassembly. I spent some time today cleaning and polishing on the satainless, however I have not put any of it on yet. furthermore I need to put the trunk, and over door weather stripping back. I will probably have the paint shop put my header and deck lid decal along with the strobe and lower fender emblem on while they have the car. I did put some of my decals on this weekend like the jack instruction, coolant, timing, air cleaner, tire pressure, and door vin. Also I purchased a trunk mat and put it in, I still need to get a spare mounted and clean my jack up to finish out the trunk. As I put the side glass and upper door panels in i installed my new window felts, and i would like to say that I was disappointed with them. I purchased the felts from restoration specialty and I complained to them when they arrived that the shape of the felts was not the same as the originals. The response was - all the other b body guys use them and dont complain. When I got to trying to put them in they provided some hardware however the interior felts had no provision for mounting, and the rear interior sail panel peice had a very poor fitting bend in it.


Re: finally a little green
Looks awesome, you have done great job! 
Re: finally a little green
cant wait to see it with the stripe!
AKA Butterscotch71....the road runner nest is out to win you over this year!
-
sdweatherman

- Site Admin
- Posts: 795
- Joined: Tue Sep 14, 2010 2:36 pm
- My Cars: 1971 GY8 Plymouth Satellite Sebring Plus
1971 GB7 Plymouth Satellite Sebring Plus factory Sunroof
1972 EV2 Plymouth Satellite Sebring Plus factory Sunroof
1974 KB5 Plymouth Road Runner GTX Dealer Announcement car - Location: Rapid City, SD
- Contact:
Re: finally a little green
Looks great!
1971 GY8 Plymouth Satellite Sebring Plus
1971 GB7 Plymouth Satellite Sebring Plus w/factory Sunroof
1972 EV2 Plymouth Satellite Sebring Plus w/factory Sunroof
1971 GB7 Plymouth Satellite Sebring Plus w/factory Sunroof
1972 EV2 Plymouth Satellite Sebring Plus w/factory Sunroof